Friday, 31 July 2009
New Lens
Sunday, 26 July 2009
Split Toning - My Attempt
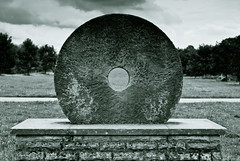
Tim Rudman Exhibition
Tim Rudman is known for his split-toned prints - a technique he uses in most of his images - and holds distinctions from around the world for his innovative style of printing. Have a look at the gallery on his website - especially his works on the derelict Brighton Pier. They are even more impressive close-up.
Split toning is a technique whereby the shadows and highlights of an image are subtly different colours, producing an amazing effect if done properly. It's mostly used on a black and white image where subtle selenium and sepia tones are introduced. There is a good tutorial here on how to manage a similar effect in Photoshop. Tim Rudman uses a traditional chemical process to achieve split toning. I have no idea if the Photoshop results look as good, but I intend to give it a try when I next take a couple of portrait shots.
The exhibition officially finishes today - but there are permanent galleries on display on his website, and Tim Rudman seems to exhibit around the world fairly regularly. Definately a photographer worth seeking out.
Thursday, 23 July 2009
Panoramic Shots
 View of Boxhill, Surrey
While out walking the other day, I thought I'd try my hand at a panoramic shot. I'm not much of a landscape photographer, but I picked up a couple of tips from when I was down at the RPS course in bath from a fellow photographer. This is the result of my efforts, and for a first go I'm pretty pleased with the results. Here's how I did it - in a simple guide for other beginners like me. You can make any of the images in this tutorial larger by clicking on the image itself.
Firstly, before you shoot, do these 4 things:
- Set your camera to manual focus. If you don't do this, as you pan your camera around or walk along, your camera will adjust its focus.
- Set your camera to manual white balance. Again, if you don't do this, your camera will adjust the white balance as you walk along.
- Set your camera to manual (as opposed to Aperture Priority, Shutter Priority, etc)otherwise you will get a variable depth of field or shutter speed which will ruin your panorama.
- Take a few test shots to make sure you are happy with your camera settings.
You are now ready to begin your panorama. Walk along in a straight line, taking photos of your chosen scene. Make sure that your shots overlap. Here are three of the 10 or so shots I used to create the panorama above, giving you an idea of the overlap necessary for good results. I reckon each frame should overlap the previous by about 50% in order to get a smooth stitch later on:


You may be able to get away with less, but taking more shots or using a smaller overlap certainly won't do you any harm. Once you have taken a series of shots, it's time to start editing. I used Adobe Photoshop CS3 for this shot, but there are other dedicated programs such as Hugin, Photomatix and PTgui. I haven't used them, so I would welcome any comments with other users' experiences.
Armed with a series of images, the next step in Photoshop is to go to File > Automate > Photomerge. This will bring up a box as below.

The left-hand column offers several panoramic options and corrections. In this case, I left mine to Automatic, meaning that Photoshop will try to reposition images to align them correctly, as well as make any basic perspective corrections to create a smooth final image. Select the photos you wish to add to your panorama by clicking Browse and then hold down CTRL as you select photos to select multiple images at once. You will return to the box above, with your selected files listed.
Now all that remains for you to do is click OK and wait for Photoshop to do the hard work!
After a couple of minutes - depending on how many images you are using and the power of your PC - you will end up with something like the image below. This example is only using the 3 images I have chosen from above - you will be using more than this for a real panorama.

There are several jagged edges where the photos did not quite line up properly. Don't worry about this - it's impossible to take a panorama without this happening.
All that remains for you to do is crop the final image, and your panorama is complete. It's such a simple technique when you know how, and will open up all sorts of photographic opportunities. Give it a try!
Tuesday, 21 July 2009
Maps
Until the end of July, Dash4it have got 30% off all Ordnance Survey maps with free next day delivery. Considering that even the standard Explorer maps are usually £7 a go in the shops, this is a great offer - reducing the cost of a standard map down to £5.59. If you use the discount code JULY9 at the checkout, you get an extra 5% off as well.
OS Explorer maps are a great way of finding new spots to photograph - I'm off today to explore around Great Bookham in Surrey. The weather isn't good, but I'm sure I'll find something - must dash though, as my girlfriend is starting to stomp around waiting to go!
Monday, 20 July 2009
Histograms
However, I found this excellent visual tutorial to reading a histogram earlier on today over at Luminous Landscape which explains it in some detail.
Friday, 17 July 2009
Sports Photography 3 - Shots on the Cheap
One of the biggest constraints of the amateur photographer is the lens. As previously discussed, professional sports lenses can cost anything in the region of £1500 - 7000, far beyond the budget of most people. Most sports photographers also carry a range of fixed lenses with them, further increasing the outlay. At the moment, I only use a Nikon 70 - 300mm f4-5.6 G-type lens - it's about the cheapest telephoto on the market.

Joe Denly Practicing
If your chosen sport has a "warm up" period prior to the main action, it can be a very good time to get closer shots than might otherwise be possible. The example I've used here was taken at a Surrey vs Kent cricket match a couple of weeks ago. My lens is nowhere near powerful enough to pick out facial detail from 500 yards away, but during the players' warm up they were practicing on the edge of the outfield, so I was able to get much closer. The other advantage of shooting in the warm up is that most of the crowd won't be paying very much attention - if you need to move around, people are much more willing to have their view momentarily obstructed than during the main action.
2. Shoot with a crop in mind

Greg Randall
Shooting from the stands, you will rarely have much control over the viewpoint of your shots. With that in mind, I find it helpful to "see" a completed shot with a crop in mind. It's not ideal, but it works - take a look of the portrait of Greg Randall at an ice hockey match. Your pictures may look cluttered in camera, but a bit of Photoshopping after the event can work wonders
3. Shoot images that capture some of the atmosphere around the ground
 T-Shirt Gun
Think of shooting at a sports event as an opportunity for a photographic essay. Newspapers generally only carry at most a couple of pictures from an event, so they don't look repetitive. If you're shooting for a couple of hours or more and all your shots are of the action, no matter how good they are, they will start to look the same after a while. Use the opportunity to take shots of other action around the ground / arena - in these kind of shots, you're competing on a level playing field with the professionals.
Sunday, 12 July 2009
RPS Workshop Report - An Introduction to Documentary Photography

Last weekend, as already posted, I attended a Royal Photographic Society workshop - "An Introduction to Documentary Photography". Led by John Roe ARPS and Jo Webster ARPS, the course took place at the American Museum in Bath from 4th - 5th July. The course runs several times during the year, and costs £155 for the two days.
There were 10 people on my course, which felt like a good number. All had a variety of experience, from a professional photographer looking to broaden his experience, to one person who'd only bought his D-SLR camera the day before. Most of us fell somewhere in between, being serious amateurs for the most part.
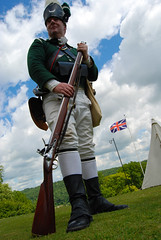
The first day started at 10am with a talk by John Roe on classic elements of documentary photography, and looking at examples by master photographers. With those in mind, we then set about looking to put his teaching into practice using the 4th July celebrations as our model. The centrepieces of the celebrations were the 18th-century re-enactors from the Crown Forces and Queens Rangers, who gave demonstrations of equipment, musketry and their cannon. They also set up a camp, and spoke to people all day. There were other side attractions - a circus performer, an 18th-century gentleman, as well as the museum itself - but the focus was on the re-enactors, and they were the subjects most commonly photographed.
Every 2 hours we would report back to our log cabin for Jo Webster to have a look at our images, as well as offer each other feedback. Jo was especially helpful and provided guidance without being dictatorial, and her criticism was always constructive. This was then repeated for the next day, allowing each of us a chance to build up a small portfolio of 3 - 15 images from the weekend, when John Roe would also look at our work.
I found the event very enjoyable. The tuition was good, though I think there could have been a little more on the second day. The other participants also made it enjoyable, with most keen to share their experience and try out new things. I think we all learnt something from it, and I would recommend it to anyone considering trying out one of the RPS' courses.
You can see more of my images over at my Flickr page.
Thursday, 9 July 2009
Monday, 6 July 2009
Talk Photography
Sunday, 5 July 2009
Private Spencer
Saturday, 4 July 2009
Happy 4th July!
I've never been on an RPS course, but I have high hopes and expectations. I'll post a report next week along with some sample images.
Wednesday, 1 July 2009
Sports Photography 2 - Ideas
As an amateur "sports photographer", your aim is to make people look at the image.
This means that the people appearing in the image do not have to be famous, instantly-recognisable superstars. It is better to try and show something attractive about the sport or personalities playing - after all, you most likely aren't taking pictures to support a chunk of text - though many amateur photographers do provide coverage for local newspapers. Have a look at this example of mine:
 Milton Keynes Lightning
This is a simple image of a goal celebration in an ice hockey match. The league and team that the players come from doesn't matter - the image is about the emotion and joy when a goal is scored. It could easily be the NHL; it happens to be the English Premier League.
Approach local sports teams and take your camera to local events - you will be amazed just how much enjoyment you will get from taking shots, and likewise how much local teams enjoy being photographed. So long as you are polite and respectful, most teams will love having a photographer to take shots of them.
There is enormous scope for taking photos of amateur sport - my images tend to revolve around the things I'm interested in - ice hockey, cricket, boxing, etc. This is the joy of the amateur. Most sports are not "professional only", so seek out lower-league or semi-pro opportunities. Explain who you are and what you'd like to do, and most sports will open up for you.
In my next post, I'll look at some techniques to make the most of limited shooting opportunities at professional events.
