Over the last week I've photographed some donkeys, a couple of bands (by request) and taken some cheesy holiday snaps. Nothing's really inspired me. I've also been reading Bryan Peterson's Understanding Exposure
Sunday, 23 August 2009
Gone Sailing
It's been a couple of weeks since I updated my blog - mainly because of work pressures prior to a short holiday. I'm off all this week sailing around the Solent and the English Channel, and there should be some smashing photo opportunities.
Over the last week I've photographed some donkeys, a couple of bands (by request) and taken some cheesy holiday snaps. Nothing's really inspired me. I've also been reading Bryan Peterson's Understanding Exposure , and Learning to See Creatively
 . They're both very good books, well supported with excellent images. They're ideal for a beginner, but in honesty I do prefer Michael Langford's Starting
 / Basic
 / Advanced
 photography series, which have a lot more text and explanation. That being said, Amazon have got them at very good prices, so there's no reason not to buy them all - it's a lot cheaper than a photography course!
Over the last week I've photographed some donkeys, a couple of bands (by request) and taken some cheesy holiday snaps. Nothing's really inspired me. I've also been reading Bryan Peterson's Understanding Exposure
Thursday, 13 August 2009
Rejection and a Silver Lining
Last weekend, I took some pictures of a jousting tournament using my new 80 - 200mm f/2.8 lens. Some of them turned out really well - so well that I decided to submit them to the local newspaper, the Surrey Herald.
Initially, the photo editor said, "We don't pay for photos". He then admitted that he didn't actually have any photos of the event, despite wanting to run a story on it. I wasn't happy about giving good quality pictures away for free to a commercial newspaper (the Surrey Herald isn't a freebie local), so I withdrew my offer. Within seconds, the editor changed his mind and agreed to a price of £35 per picture used. I sent my images over.
Sadly, they weren't used. Instead, the Surrey Herald ran with some images donated by another local amateur for free. I won't knock his work on my blog, since he can't really reply, but I've had a look at some of his images on his website and they're not up to much. Often his images are soft, overexposed and lacking a subject. Nevertheless, I was rejected.
However, I was very quickly contacted by the performers themselves, who had found their images on Flickr. They liked them - a lot. So much so, that they have asked to use them for their portfolio shots as they join the National Stunt Register. This made me very happy, and reinforced my belief that my pictures were not technically or artistically deficient. They may provide more photo opportunities in the future, so I happily let them have a couple of images for free.
I did my bit to try not to undermine professional photography, but it seems that no matter what you do, you just can't beat free.
Thursday, 6 August 2009
Annie Leibowitz Crunched
I read this in last night's Evening Standard. Annie Leibowitz, the world's highest-paid photographer, is in an immense amount of financial trouble.
I'm no student of Leibowitz, but I do think some of her work is fantastic. She has taken some of the most iconic celebrity photographs of the last 30 years, and will always be remembered among the photography community for that. Now, though, with her debts being completely unmanageable (which seems to be the result of over-indulging and overspending on luxury properties), she stands to lose the rights to her entire photography collection.
That would surely be devastating news for any photographer - to watch creative control of their entire life's work pass into the hands of lawyers.
Tuesday, 4 August 2009
High Dynamic Range Photography
HDR photography is very popular at the moment. I have seen some awful examples, and rarely, I see some spectacular examples. This picture, taken from the Stuck in Customs blog by 38-year old Texas-based photographer Trey Ratcliff, is outstanding. It knocks my Paris photos into a cocked hat. His blog is an outstanding collection of HDR travel photography - probably the finest I have ever seen.
I have never attempted HDR photography, but after seeing Ratcliff's work, I feel inspired to give it a go when I'm next out and about.

I have never attempted HDR photography, but after seeing Ratcliff's work, I feel inspired to give it a go when I'm next out and about.
Sunday, 2 August 2009
Fake Nikon Goods on eBay
Having purchased my new lens, I ordered an HB-7 lens hood - the only compatible hood that Nikon make for the 80 - 200mm f/2.8. I always recommend using one to help reduce flare and ghosting. The trouble is, most camera shops charge over £30 for what is - essentially - a piece of plastic with a screw thread.
As a solution to my problem, I trawled eBay for HB-7 hoods. Most were being sold from Hong Kong with a 2-week dispatch estimate. Not wanting to wait two weeks, I hunted out a UK seller with next-day delivery, with a reasonably priced hood around the £15 mark. Smashing, I thought. I was not so amused when this lump of crap arrived in the post:

As a solution to my problem, I trawled eBay for HB-7 hoods. Most were being sold from Hong Kong with a 2-week dispatch estimate. Not wanting to wait two weeks, I hunted out a UK seller with next-day delivery, with a reasonably priced hood around the £15 mark. Smashing, I thought. I was not so amused when this lump of crap arrived in the post:
It's not even a good attempt at being a fake Nikon hood. The logo is wrong, the box is just plain bollocks, and the hood itself is utter rubbish. It doesn't even stay on the front of the lens or fix securely. On top of that, it lets light in through the side of the lens...which rather renders it useless.
Buyer beware on eBay...
Friday, 31 July 2009
New Lens
I am now the proud owner of a Nikon 80 - 200mm f/2.8 AF-D lens. It's a lovely bit of glass - amazing to hold, and not as heavy as earlier models. The focus is sharp, and it's amazing to be able to have an f/2.8 capability all the way through the zoom range. I'm looking forward to using it at ice hockey matches when September comes around again.
Sunday, 26 July 2009
Split Toning - My Attempt
I took this photo today in Windsor Great Park and decided to have a go at Split Toning after seeing Tim Rudman's work. I'm really pleased with the photo, though it's not as subtle as his. I think it really lifts the work, and gives an "edgier" look than conventional black and white.
Tim Rudman Exhibition
Yesterday, I was passing by The Lightbox in Woking and decided to have a look around. The building is fantastic, though for all its size, there isn't a great deal on display. However, one thing that did catch my eye was a photographic exhibition by Tim Rudman.
Tim Rudman is known for his split-toned prints - a technique he uses in most of his images - and holds distinctions from around the world for his innovative style of printing. Have a look at the gallery on his website - especially his works on the derelict Brighton Pier. They are even more impressive close-up.
Split toning is a technique whereby the shadows and highlights of an image are subtly different colours, producing an amazing effect if done properly. It's mostly used on a black and white image where subtle selenium and sepia tones are introduced. There is a good tutorial here on how to manage a similar effect in Photoshop. Tim Rudman uses a traditional chemical process to achieve split toning. I have no idea if the Photoshop results look as good, but I intend to give it a try when I next take a couple of portrait shots.
The exhibition officially finishes today - but there are permanent galleries on display on his website, and Tim Rudman seems to exhibit around the world fairly regularly. Definately a photographer worth seeking out.
Thursday, 23 July 2009
Panoramic Shots
 View of Boxhill, Surrey
While out walking the other day, I thought I'd try my hand at a panoramic shot. I'm not much of a landscape photographer, but I picked up a couple of tips from when I was down at the RPS course in bath from a fellow photographer. This is the result of my efforts, and for a first go I'm pretty pleased with the results. Here's how I did it - in a simple guide for other beginners like me. You can make any of the images in this tutorial larger by clicking on the image itself.
Firstly, before you shoot, do these 4 things:
- Set your camera to manual focus. If you don't do this, as you pan your camera around or walk along, your camera will adjust its focus.
- Set your camera to manual white balance. Again, if you don't do this, your camera will adjust the white balance as you walk along.
- Set your camera to manual (as opposed to Aperture Priority, Shutter Priority, etc)otherwise you will get a variable depth of field or shutter speed which will ruin your panorama.
- Take a few test shots to make sure you are happy with your camera settings.
You are now ready to begin your panorama. Walk along in a straight line, taking photos of your chosen scene. Make sure that your shots overlap. Here are three of the 10 or so shots I used to create the panorama above, giving you an idea of the overlap necessary for good results. I reckon each frame should overlap the previous by about 50% in order to get a smooth stitch later on:


You may be able to get away with less, but taking more shots or using a smaller overlap certainly won't do you any harm. Once you have taken a series of shots, it's time to start editing. I used Adobe Photoshop CS3 for this shot, but there are other dedicated programs such as Hugin, Photomatix and PTgui. I haven't used them, so I would welcome any comments with other users' experiences.
Armed with a series of images, the next step in Photoshop is to go to File > Automate > Photomerge. This will bring up a box as below.

The left-hand column offers several panoramic options and corrections. In this case, I left mine to Automatic, meaning that Photoshop will try to reposition images to align them correctly, as well as make any basic perspective corrections to create a smooth final image. Select the photos you wish to add to your panorama by clicking Browse and then hold down CTRL as you select photos to select multiple images at once. You will return to the box above, with your selected files listed.
Now all that remains for you to do is click OK and wait for Photoshop to do the hard work!
After a couple of minutes - depending on how many images you are using and the power of your PC - you will end up with something like the image below. This example is only using the 3 images I have chosen from above - you will be using more than this for a real panorama.

There are several jagged edges where the photos did not quite line up properly. Don't worry about this - it's impossible to take a panorama without this happening.
All that remains for you to do is crop the final image, and your panorama is complete. It's such a simple technique when you know how, and will open up all sorts of photographic opportunities. Give it a try!
Tuesday, 21 July 2009
Maps
I particularly enjoy hiking, and am a big fan of the website WalkingWorld. However, sometimes I like to design my own walks - to assist with that, I've learned of a great offer from someone over at the Talk Photography forums.
Until the end of July, Dash4it have got 30% off all Ordnance Survey maps with free next day delivery. Considering that even the standard Explorer maps are usually £7 a go in the shops, this is a great offer - reducing the cost of a standard map down to £5.59. If you use the discount code JULY9 at the checkout, you get an extra 5% off as well.
OS Explorer maps are a great way of finding new spots to photograph - I'm off today to explore around Great Bookham in Surrey. The weather isn't good, but I'm sure I'll find something - must dash though, as my girlfriend is starting to stomp around waiting to go!
Monday, 20 July 2009
Histograms
A histogram is a useful tool when reviewing a digital exposure, and is an excellent way to check if highlights are blown out or if your lens is capturing a wide tonal range. Many people find histograms confusing, and I have to admit that I learned to read them through trial and error more than anything else.
However, I found this excellent visual tutorial to reading a histogram earlier on today over at Luminous Landscape which explains it in some detail.
However, I found this excellent visual tutorial to reading a histogram earlier on today over at Luminous Landscape which explains it in some detail.
Friday, 17 July 2009
Sports Photography 3 - Shots on the Cheap
Continuing my past posts on Sports Photography techniques, today I'll share my thoughts on some successful techniques I've used to create successful action shots on a budget.
One of the biggest constraints of the amateur photographer is the lens. As previously discussed, professional sports lenses can cost anything in the region of £1500 - 7000, far beyond the budget of most people. Most sports photographers also carry a range of fixed lenses with them, further increasing the outlay. At the moment, I only use a Nikon 70 - 300mm f4-5.6 G-type lens - it's about the cheapest telephoto on the market.
One of the biggest constraints of the amateur photographer is the lens. As previously discussed, professional sports lenses can cost anything in the region of £1500 - 7000, far beyond the budget of most people. Most sports photographers also carry a range of fixed lenses with them, further increasing the outlay. At the moment, I only use a Nikon 70 - 300mm f4-5.6 G-type lens - it's about the cheapest telephoto on the market.
1. Shoot at "alternative" moments

Joe Denly Practicing
If your chosen sport has a "warm up" period prior to the main action, it can be a very good time to get closer shots than might otherwise be possible. The example I've used here was taken at a Surrey vs Kent cricket match a couple of weeks ago. My lens is nowhere near powerful enough to pick out facial detail from 500 yards away, but during the players' warm up they were practicing on the edge of the outfield, so I was able to get much closer. The other advantage of shooting in the warm up is that most of the crowd won't be paying very much attention - if you need to move around, people are much more willing to have their view momentarily obstructed than during the main action.
2. Shoot with a crop in mind

Greg Randall
Shooting from the stands, you will rarely have much control over the viewpoint of your shots. With that in mind, I find it helpful to "see" a completed shot with a crop in mind. It's not ideal, but it works - take a look of the portrait of Greg Randall at an ice hockey match. Your pictures may look cluttered in camera, but a bit of Photoshopping after the event can work wonders
3. Shoot images that capture some of the atmosphere around the ground
 T-Shirt Gun
Think of shooting at a sports event as an opportunity for a photographic essay. Newspapers generally only carry at most a couple of pictures from an event, so they don't look repetitive. If you're shooting for a couple of hours or more and all your shots are of the action, no matter how good they are, they will start to look the same after a while. Use the opportunity to take shots of other action around the ground / arena - in these kind of shots, you're competing on a level playing field with the professionals.
Sunday, 12 July 2009
RPS Workshop Report - An Introduction to Documentary Photography

Last weekend, as already posted, I attended a Royal Photographic Society workshop - "An Introduction to Documentary Photography". Led by John Roe ARPS and Jo Webster ARPS, the course took place at the American Museum in Bath from 4th - 5th July. The course runs several times during the year, and costs £155 for the two days.
There were 10 people on my course, which felt like a good number. All had a variety of experience, from a professional photographer looking to broaden his experience, to one person who'd only bought his D-SLR camera the day before. Most of us fell somewhere in between, being serious amateurs for the most part.
The first day started at 10am with a talk by John Roe on classic elements of documentary photography, and looking at examples by master photographers. With those in mind, we then set about looking to put his teaching into practice using the 4th July celebrations as our model. The centrepieces of the celebrations were the 18th-century re-enactors from the Crown Forces and Queens Rangers, who gave demonstrations of equipment, musketry and their cannon. They also set up a camp, and spoke to people all day. There were other side attractions - a circus performer, an 18th-century gentleman, as well as the museum itself - but the focus was on the re-enactors, and they were the subjects most commonly photographed.
Every 2 hours we would report back to our log cabin for Jo Webster to have a look at our images, as well as offer each other feedback. Jo was especially helpful and provided guidance without being dictatorial, and her criticism was always constructive. This was then repeated for the next day, allowing each of us a chance to build up a small portfolio of 3 - 15 images from the weekend, when John Roe would also look at our work.
I found the event very enjoyable. The tuition was good, though I think there could have been a little more on the second day. The other participants also made it enjoyable, with most keen to share their experience and try out new things. I think we all learnt something from it, and I would recommend it to anyone considering trying out one of the RPS' courses.
You can see more of my images over at my Flickr page.
Thursday, 9 July 2009
Monday, 6 July 2009
Talk Photography
I have just stumbled across an excellent photography discussion website, Talk Photography. It is British in origin, but like most websites, draws members from all over the world. It seems to be very heavily populated (roughly 500 members online at any one time), so is well worth a visit. From what I've seen, the participants are very friendly and helpful. I've added a permanent link to the site over on the right sidebar.
Sunday, 5 July 2009
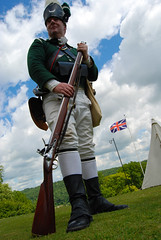
Private Spencer
I have returned from the RPS workshop this weekend in Bath, thoroughly sunburnt. This is one of my favourite images of the weekend, which comes highly recommended. It was a great introduction to documentary photography and I certainly learned plenty from it. Covering the same subject for two days certainly places great demands on a photographer...and right now, all I want to do is head for bed! See my Flickr photostream for more images from the event so far.
Saturday, 4 July 2009
Happy 4th July!
To all my American readers, happy Independence Day! 4th July is not an occasion that is celebrated in England (indeed, many Brits would struggle to name exactly what America was independent from!), but this year is a little different for me. I'm going on a course run by the Royal Photographic Society down at the American Museum in Bath, where I'll be covering the traditional 4th July celebrations and historical re-enactments.
I've never been on an RPS course, but I have high hopes and expectations. I'll post a report next week along with some sample images.
I've never been on an RPS course, but I have high hopes and expectations. I'll post a report next week along with some sample images.
Wednesday, 1 July 2009
Sports Photography 2 - Ideas
Photos of professional, top-flight sportsmen adorn the back pages of almost every newspaper across the country. News and shots from major events of the day are the stuff of journalists the world over. Most of these professional images are technically excellent - they convey excitement, drama and emotion - yet they rarely get looked at for more than a few moments, because their purpose is primarily to inform and support a chunk of text.
As an amateur "sports photographer", your aim is to make people look at the image.
This means that the people appearing in the image do not have to be famous, instantly-recognisable superstars. It is better to try and show something attractive about the sport or personalities playing - after all, you most likely aren't taking pictures to support a chunk of text - though many amateur photographers do provide coverage for local newspapers. Have a look at this example of mine:
 Milton Keynes Lightning
This is a simple image of a goal celebration in an ice hockey match. The league and team that the players come from doesn't matter - the image is about the emotion and joy when a goal is scored. It could easily be the NHL; it happens to be the English Premier League.
Approach local sports teams and take your camera to local events - you will be amazed just how much enjoyment you will get from taking shots, and likewise how much local teams enjoy being photographed. So long as you are polite and respectful, most teams will love having a photographer to take shots of them.
There is enormous scope for taking photos of amateur sport - my images tend to revolve around the things I'm interested in - ice hockey, cricket, boxing, etc. This is the joy of the amateur. Most sports are not "professional only", so seek out lower-league or semi-pro opportunities. Explain who you are and what you'd like to do, and most sports will open up for you.
In my next post, I'll look at some techniques to make the most of limited shooting opportunities at professional events.
Friday, 26 June 2009
Sports Photography 1 - Considerations
Sports photography is a challenging field to work in. On a technical level, the lenses required for most sports are very expensive, and to add to the difficulty, amateur photographers are likely to have only very restricted access at a professional event.
For most professional sports, an amateur photographer will have to confine themselves to the crowd along with everyone else. This can cause all manner of problems:
For most professional sports, an amateur photographer will have to confine themselves to the crowd along with everyone else. This can cause all manner of problems:
- The photographer is unable to move around freely
- Key moments may be interrupted by people moving around in front
- It is impossible to set up a tripod, and even a monopod may prove difficult
- The photographer may be too far back from the action, beyond the capabilities of their equipment
- Indoor lighting will be uneven and focussed on the play area
Most sports require the crowd to sit some way back from the action. Therefore, to get a shot of a player in action will require a telephoto lens with a reasonable zoom. Now the problems begin:
- Freeze-frame action requires fast shutter speeds to avoid motion blur
- Fast shutter speeds require wider aperture settings
- Telephoto lenses generally don't go wider than f5 without the cost skyrocketing
These problems can be made even more acute with indoor sports, where the artificial lighting indoors will be uneven and not suited to photography. Dimmer lighting conditions will also require lengthier exposures - but remember the problem with the tripod? With most standard kit the only solution is to crank up the ISO sensitivity, but with this comes a loss of picture quality.
Professional sports photographers overcome these difficulties by having top-quality telephoto lenses with enormous zoom capabilities, or a range of fixed prime lenses (rrp £6000 - 16000) along with access to press areas and freedom of movement around the event. They also have room to set up tripods, monpods, etc. In simple terms, they are not hampered by the many difficulties faced by the amateur photographer.
Yet it is possible for the amateur photographer to take very credible and pleasing sports shots. Over the next week or so, I will post more in this series with ideas and examples of my own work.
Wednesday, 24 June 2009
Puppy
I have been taken away from the world of photography for the past week by the arrival of a new golden labrador puppy, named Willow (pictures to follow). Also, this evening, I'm going to take some pictures of one of my favourite sports and show some of the difficulties facing sports photographers, and just why some of the kit they need is so expensive.
Thursday, 18 June 2009
Image Makeover
Most photography websites and blogs are very artistic and stylish in their presentation, so I can't help but feel that Photo Plod lacks some panache. Unfortunately, my patience with configuring Blogger wears very thin after a while spent tweaking things. I would rather the site remains functional and easy to access rather than turn into a triumph of style over substance, but if anybody has any suggestions for templates or a new "look" for the blog, I'll be happy to consider them.
Tuesday, 16 June 2009
Bob Landry - Part 3
This week's Bob Landry round-up finishes with two contrasting photos, both taken in the same year, showcasing Landry's outstanding photojournalistic prowess and his effortless eye for classic Hollywood glamour. I won't add any of my own comments...suffice it to say that I will let the images speak for themselves.

French Patriots and a German Collaborator -Bob Landry (1945)
 Fred Astaire - Bob Landry (1945)
Monday, 15 June 2009
Bob Landry - Part 2
 Rita Hayworth - Bob Landry (1941)
As well as war photography, Bob Landry perhaps rose to fame with this iconic shot of American actress Rita Hayworth. It rapidly became one of the most popular pin-up shots of the war, adorning GI's lockers all over the world. It was considered racy and provocative in 1941 but is, of course, tame by modern standards. In technical terms, it isn't even a particularly good shot - Hayworth's face is a tad over-exposed and she is casting a fairly strong shadow - but this wasn't a set-up studio shot. Landry managed to capture Hayworth in an intimate moment, and there is no single definitive story of how this came about. Landry managed to capture intimate glamour - indeed, I would argue that the technical deficiency of the image actually enhances this. The viewer is invited to feel like they are looking at a cheeky clandestine shot of one of the world's most famous women. The image feels (by 1941 standards) voyeuristic - a forbidden pleasure.
Sunday, 14 June 2009
Bob Landry
Perhaps more famous for being the only photographer to be in the first wave of troops on D-Day in 1944 (and consequently losing all of his footage), Bob Landry took many iconic shots of the 1940's. This is one of my favourites:

Chaplain playing violin with singing British 8th Army staff the night before an attack - Bob Landry (1942)
This image has particular resonance with me, as my own grandfather was in the 8th Army in North Africa at this time, and for all I know he could even be in that photo. It's a wonderfully simple, powerful image, with the troops framed by a setting sun on the horizon that says a great deal about humanity at a time of war. The only detail that can be seen in the shot is the truck, with all the troops reduced to silhouettes - anonymous for all time.
I will post another iconic Bob Landry shot tomorrow.
Saturday, 13 June 2009
No Way Like the American Way
 Breadline During the Louisville Flood - Margaret Bourke-White (1937)
An iconic shot from LIFE magazine - one of my favourites.
Friday, 12 June 2009
Using Line

Most photographers often use natural or man made "lines" in photographs as a way of leading the viewer into the subject - the classic "lead line". The above photo is a literal interpretation of this, with the photographer using two railway tracks to guide the eye into the mist and the sun. One of the many skills of a photographer is in recognising these lines in everyday features. Have a look at this example:
 Arches, Lines & Stairs - Jig O'Dance (2007)
 The photographer here has seen a moment where suddenly everyday, mundane features come together to make a more interesting image. By connecting the various parts with imaginary "lines", both straight and curved, the image is more coherent as a whole and pleasing to the eye. "Lines" in images can also show connection, both physical and emotional:

When used properly, subtle use of line is an important tool in the photographer's box. It can guide the viewer, hold the image together or create an emotional impact. It is applicable to almost all fields of photography, from architectural cityscapes to natural countryside scenes.
Wednesday, 10 June 2009
O. Winston Link
 Hotshot Eastbound, Iaeger, West Virginia - O. Winston Link (1956)
O. Winston Link (1914 - 2001) was a pioneering American photographer, specialising in railways and night photography. There are several excellent biographies of his life and work, so I will focus on the image above.
The focal point of this image is the young couple in the car at the drive-in movie theatre - the epitomy of 1950's America. There is a sense of modern style, from the cars to the jet aircraft displayed on the screen. And yet running across the top of the frame is the dominant steam engine and a trail of smoke. I love this image for its symbolism of transition - 19th century technology together with "hip" modernity.
On a technical level, the image is very impressive as well. Winston Link did not have the benefit of using ISO 6000 film - the fastest he could have obtained would have been somewhere around the 400 mark at best. Floodlighting the area would have destroyed the ambience of the shot and would have been virtually impossible anyway. Instead, he composed this shot using a series of linked flash bulbs scattered around and throughout the scene. It is a remarkable feat of photographic skill, considering the limits of flash at the time. The bulbs could only be used once, and each bulb in Winston Link's sequence was dependent on the previous one igniting successfully for itself to fire at the correct time. These days, such a sequence would be simple with radio-controlled flash units - but back then, Winston Link was out on his own, having to hand-make much of his equipment. If he missed the moment, he had no choice but to replace each of the flash bulbs, recompose the image and wait for the next train.
Link's images did not find popular success until comparatively late in his life, but he is now regarded as an important cultural photographer in the United States. His works are well worth browsing.
Monday, 8 June 2009
The Decisive Moment
 Man Jumping a Puddle - Henri Cartier-Bresson (1932)
This famouse image captures the very essence of the "decisive moment", and it's a skill that documentary photographers / photojournalists absolutely need to develop. I practice at local ice hockey matches - though I could only dream of having the skill that Cartier-Bresson possessed. His feats of capturing such moments are all the more remarkable considering that not only was he working with film, he even pre-dated the motor drive by over 40 years. In the shot above, Cartier-Bresson had no other choice but to time the click of his shutter to absolute perfection. Journalistic shots cannot be retaken - if the moment is missed, it is missed forever.
The "decisive moment" isn't just about action shots, however. To Cartier-Bresson, the moment also relates to balance, emotional impact - in other words, the moment a great shot comes together. It is the photographer's job to "see" this moment.
Cartier-Bresson, of all the photographic masters, is one I perhaps admire the most. He spent most of his life working with only a Leica Rangefinder camera and a 50mm lens. His sheer experience with this simple setup allowed him to instinctively know what he would see when he pointed his camera at a subject. I find this approach remarkable, and try to keep my own camera setup simple for the same reason. However, there are other far better guides to his life and work than anything I could post here. See the following suggested links:
Henri Cartier-Bresson Foundation
Sunday, 7 June 2009
Bluebells in the Woods

While we're experiencing some summery weather, I thought I'd post this recent shot of some English Bluebells, using evening sunlight to add a bit of extra depth and interest.
This was taken in Friday Street, Surrey. I'm not normally one to enjoy photographs of flowers, but I love the way that the sunlight fell on the bluebells, and tried to use a shallow depth of field to pick out what I felt was important in the scene (f5).
You can see some of my favourite walking photos on my Flickr stream.
Saturday, 6 June 2009
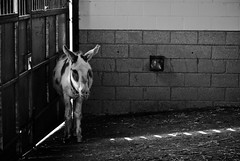
The Lonely Donkey - Part 2
To continue the theme of framing, the picture I posted yesterday of the Lonely Donkey in his pen was, in fact, nothing of the sort. The image was taken at The Donkey Sanctuary in Sidmouth, Devon. He was in a pen with around 40 other donkeys, and very well cared for.
It is a skill I work hard to develop - and it is useful to be able to see potential image within a larger framework. On this occasion, I had only a couple of seconds in which to take the shot - what Cartier-Bresson called the "Decisive Moment".
The image itself is not intended as a factual documentary record - it is meant to evoke an emotional response and ellicit sympathy for the donkey.
Friday, 5 June 2009
The Lonely Donkey - Part 1
Following on from my theme yesterday about the importance of framing in altering the meaning of a photograph, here is an example I shot a couple of years ago.
Thursday, 4 June 2009
Cause of Death
 Cause of Death - John Hilliard (1974)
This image by John Hilliard (click to see the larger view) is an excellent portrayal of the importance of framing a subject. Each of the four images shows a body, wrapped in a white shroud. In each frame is something suggesting the Cause of Death, and by adjusting crop of each frame, Hilliard changes the meaning in each. It is a very clever example of showing how the camera can "lie", and questions how subjective photography can really be. After all, the photographer has the final say in what goes into a finished image - and what gets left out.
Wednesday, 3 June 2009
Review - Jessop's Spirit Level

One of the pitfalls novice landscape photographers often fall foul of is shooting a horizon that isn't straight, and they are often harshly criticised for sloping skylines - because, ultimately, unless it's justified in some artistic way - the sky never slopes when the eye looks at it. I have often read that a spirit level is used by many photographers, so I decided to pick up a standard hotshoe spirit level from Jessops. At the time, it cost me about £6.95, but I see on their website that the price has currently risen to £10.
The spirit level itself seems well-made, and fits neatly into the camera's hotshoe. For most landscape photography this shouldn't be a problem, since you won't be using flash at the same time. The level seems accurate, and is very easy to see from all sides, being made of clear plastic.
Having said that, I can see no reason why you would have any use for this if your camera is capable of displaying grid lines in the viewfinder, as most Nikon cameras from the D80 upwards are capable of doing, along with many Canon SLRs. The disadvantage of the spirit level is you have to remove your eye away from the viewfinder to check that it is still level, whereas an in-camera gridline allows you to check the level and a whole lot more. I find the in-camera grid to be quicker and more versatile. However, if your camera doesn't have such a feature, this spirit level is a good quality little piece that will banish wonky skylines forever.

Monday, 1 June 2009
Flash at the V&A
On Friday 29th May, I went to Flash, a late-night Friday event held at the V&A. On the last Friday of each month, the V&A musuem host a late-night event, running until around 10pm. This month was the turn of photography. There were a number of events running (all listed on the link), and I was keen to go.
I arrived just before 8pm. I picked up a handy guide, but was a bit disappointed at the lack of signage - and I lost a considerable amount of time wandering around the museum trying to find the next event. Also, while this was billed as a "late night" event, much of the action was already over by the time I arrived. Nevertheless, I set off to find something of interest.
The first "event" I went to was a Camera Obscura. Most photographers should be familiar with these - a simple, darkened room into which an image from outside is projected - usually through a lens. It's like being in a giant pinhole camera. There is a particularly fine example up in Edinburgh. This version at the V&A was a simple upside-down projection of a statue that was 6ft away. The "guide" gave a fairly rubbish account of why a Camera Obscura works - beyond stating that "light travels in straight lines". She then recommended a David Hockney book, giggled a little as she moved the image in and out of focus (though without explaining why or how this happened) and very little else beyond a lot of "umming" and "erring". It certainly wasn't worth waiting for 10 minutes, and my girlfriend (not a photographer) got absolutely nothing out of it. She gives better presentations on pinhole cameras to five-year olds.
I then made my way over to the "Photo Swap Shop". This was a small exhibition of work where photographers contributed an image, entered a lottery and got a random image back. Like most other photographers, I didn't exactly want to give my best work away, so I contributed this:

It's okay - just a photo I took in the Paris catacombs in January. Not first-rate, but not bad either. Some of the photos in the swap shop were very good, but I did wish there was some small degree of vetting involved. Some people were clearly taking the mickey - contributing passport photos from their wallet or other such throwaway pictures, while others had donated expensive A4 prints. It didn't seem very fair. I ended up with a rather knackered 3 year-old 6x4 print of some out-of-focus ferns, and was glad I hadn't donated anything better. I was glad I hadn't got the head-high photo of a milk bottle on someone's doorstep.
My girlfriend and her friend went off in search of getting their portraits taken at 9.30pm - an event which was not due to finish until 9.45pm - only to find that the organisers had already packed up and were waiting for their lift home. By this stage, I had given up on finding more events, and instead just enjoyed watching people look at my photo up on the wall in the swap shop. For some reason it was very popular with Europeans - and one German tourist even took it off the wall and ran off with it at one point (he did bring it back, though). It was a strange feeling to have quite a lot of people looking at my work, and it did give me a lot of satisfaction to see them pointing at it, handling it and talking about it.
On the whole, I can't say that Flash at the V&A was an unmissable event. Quite the opposite. I'm sure if I'd have arrived earlier, I might have found some of the talks a little interesting, but these aside, the other events felt a little underwhelming. I won't make any special effort next year...but if you're in town and passing, you could do worse than to take a look.
I arrived just before 8pm. I picked up a handy guide, but was a bit disappointed at the lack of signage - and I lost a considerable amount of time wandering around the museum trying to find the next event. Also, while this was billed as a "late night" event, much of the action was already over by the time I arrived. Nevertheless, I set off to find something of interest.
The first "event" I went to was a Camera Obscura. Most photographers should be familiar with these - a simple, darkened room into which an image from outside is projected - usually through a lens. It's like being in a giant pinhole camera. There is a particularly fine example up in Edinburgh. This version at the V&A was a simple upside-down projection of a statue that was 6ft away. The "guide" gave a fairly rubbish account of why a Camera Obscura works - beyond stating that "light travels in straight lines". She then recommended a David Hockney book, giggled a little as she moved the image in and out of focus (though without explaining why or how this happened) and very little else beyond a lot of "umming" and "erring". It certainly wasn't worth waiting for 10 minutes, and my girlfriend (not a photographer) got absolutely nothing out of it. She gives better presentations on pinhole cameras to five-year olds.
I then made my way over to the "Photo Swap Shop". This was a small exhibition of work where photographers contributed an image, entered a lottery and got a random image back. Like most other photographers, I didn't exactly want to give my best work away, so I contributed this:
It's okay - just a photo I took in the Paris catacombs in January. Not first-rate, but not bad either. Some of the photos in the swap shop were very good, but I did wish there was some small degree of vetting involved. Some people were clearly taking the mickey - contributing passport photos from their wallet or other such throwaway pictures, while others had donated expensive A4 prints. It didn't seem very fair. I ended up with a rather knackered 3 year-old 6x4 print of some out-of-focus ferns, and was glad I hadn't donated anything better. I was glad I hadn't got the head-high photo of a milk bottle on someone's doorstep.
My girlfriend and her friend went off in search of getting their portraits taken at 9.30pm - an event which was not due to finish until 9.45pm - only to find that the organisers had already packed up and were waiting for their lift home. By this stage, I had given up on finding more events, and instead just enjoyed watching people look at my photo up on the wall in the swap shop. For some reason it was very popular with Europeans - and one German tourist even took it off the wall and ran off with it at one point (he did bring it back, though). It was a strange feeling to have quite a lot of people looking at my work, and it did give me a lot of satisfaction to see them pointing at it, handling it and talking about it.
On the whole, I can't say that Flash at the V&A was an unmissable event. Quite the opposite. I'm sure if I'd have arrived earlier, I might have found some of the talks a little interesting, but these aside, the other events felt a little underwhelming. I won't make any special effort next year...but if you're in town and passing, you could do worse than to take a look.
Sunday, 31 May 2009
Art and Context
I don't see myself as an "artsy" photographer, as I'm more a fan of documentary-type shots rather than high concept work. I like photographs to be appealing on their own merits, rather than becaue they were taken by a particular photographer.
A lot of high concept art can be found in the Tate Modern gallery on London's South Bank. I'm not knocking it - it just isn't really to my taste, generally, as I find I simply don't understand much of what I see. In fact, the only thing that gives it meaning I find are the accompanying written panels and explanations.
This made me think when I was last in there, as I was looking at some tastefully-arranged cereal boxes - "I'm only looking at this as a piece of art because someone is telling me to." Were these cereal boxes anywhere other than in an art gallery, they would have been viewed as a pile of recycling. However, because they were in the Tate Modern, people were stroking their chins and poring over them, conceptualising and imagining. It made me think that context is of paramount importance.
I tried a little experiment. When nobody was around, I took a photo of the gent's toilets (sadly I don't have it to hand). It was an image of three egg-shaped urinals on a black tiled wall. I showed it to people and said, "I was at the Tate Modern the other day. I took this photo. Is it an artwork, or is it the gent's toilets?". Because of the reference to the Tate Modern, almost everybody viewed it as an artwork.
Now consider the same for photography. Are your images only artistic because you're telling people what they are outside of the images, or do they speak for themselves? When you hear a name like Ansel Adams or Cartier-Bresson, do you immediately change the way you're looking at an image?
Friday, 29 May 2009
Review - GRES Camera Repair
Not so long ago, I dropped my telephoto lens on the floor. It fell onto carpet, and nothing seemed damaged at the time. I thought I'd had a lucky escape. That night, I went down to watch an ice hockey match and take some photos. From where I was sitting, a telephoto lens was the only way I was going to get any decent shots, so I fixed it on and turned the barrel to zoom in...only to find that the barrel would turn, but the lens would not zoom. Clearly, I had not been so lucky after all.
I assumed that camera repair shops would be fairly common - especially at a time when we possess so many consumer electronics - so I decided to do some research on the internet to find my "local" camera repair shop. To my dismay, camera repair shops seemed to be few and far between. Worse still, the "London Camera Repair Shop" made it clear in their advertising that they were for profess>ionals, and that they did not undertake work on any camera "less" than a D300, except in special circumstances - and that even if I did manage to persuade them to fix my lens, it would go to the bottom of their priority list. I was put off straight away.
Then I found GRES Camera Repair in Epsom, Surrey, and thank god I did. GRES is run by Graham Rose, and he has been in the camera trade for over 40 years, having first worked for Nikon and then branched out on his own over 20 years ago. I gave him a call, and expected him to tell me that my £100 lens simply wasn't worth the effort to repair. On the contrary, Graham invited me to bring my lens round, and he would then be able to quote me once he had an idea what the problem was. By unlucky coincidence, I had also managed to break one of the legs on my father's antiquated Velbon tripod (the A-1, manufactured around 1970), so decided to see if he could repair this as well. Graham told me he could probably repair both the lens and the tripod together for under £100, and to leave it with him. However, parts would be difficult to come by - especially for the tripod.
It took around 6 weeks before I next heard from Graham to tell me that everything was fixed, and that the final bill was only £85. I raced round, and only then did I learn the extent of the repair job he had done. Graham had given my lens an entirely new barrel - I had managed to shatter some sort of internal drive piece, and he had taken the whole thing apart to find the problem. It worked - and looked - as good as new. Then came the tripod. That had been a problem, since Velbon stopped making parts for it about 30 years ago. As a solution, Graham had again taken the tripod apart and copied the internal parts in his workshop, made some moulds, and then manufactured bespoke new working parts from a strong composite plastic. The result was so good, I couldn't - and still can't - tell which leg it was that he repaired. This meant so much to me - and to do it all for under £100, I couldn't believe it.
GRES provided a first-class service, going far beyond what I would have expected from any repair shop. When a technician is so determined to fix your problem that he will even manufacture parts he can't get hold of, you can't help but feel special and valued. Graham was friendly and extremely knowledgable, and I can't recommend his services highly enough. He has customers from all over the country, and I'm not surprised. Five stars, thoroughly well deserved.

Thursday, 28 May 2009
Exhibiting Work
I've just been reading a discussion forum over on PhotoSIG where the author of the topic talks about having a fear of showing his work to other people. This is perfectly understandable - artists from all backrounds and disciplines show an innate insecurity and desire for perfection, from the classic "stage fright" of actors, to the "never quite finished" attitude of a film director. However, there comes a point where this insecurity actually stops creativity altogether, as seems to have happened to this unfortunate person.
As a photographer, my aim has always been to capture images for enjoyment - both mine and others. Fortunately, my dad was also an amateur photographer, and I was able to show him my early efforts without fear. No doubt many of them were rubbish, but it encouraged me to keep going. I'm comfortable enough now with my skills to show lots of other people too - even though I know there are millions of photographers who have far better skills than I do. I get great enjoyment from developing my knowledge and putting it into practice, but I get even more in producing a final print and displaying it. I believe that if you're passionate about your image and you really enjoy it yourself, then you can convey that to others. If you're too afraid to show any of your images, then ask yourself - why is that? Do you not enjoy them? If not, why not?
It must surely be better to "get things out there" than to cover them up for fear of not being perfect.
Wednesday, 27 May 2009
Review - Kingsley Photographic

Based at 93 Tottenham Court Road, London, I have been a satisfied customer of Kingsley Photographic for many years - ever since I bought my first batch of Ilford Black & White film from them. Only a 2-minute walk from Warren St tube station, they are a specialist Nikon dealer, and have an outstanding range of products. I have never walked away empty-handed or had to order something because they didn't have it in stock. I have always found the staff helpful and knowledgable, and happy to take the time out to talk to me when I had questions. Sure, you can probably find certain items cheaper on the internet - but the difference here isn't as large as, say, at Gray's of Westminster, who tend to flood photography magazines with posh-looking adverts and some of the highest prices around for Nikon equipment. What you get at Kingsley Photographic is excellent service, quality advice and staff who actually care about what you buy. They also stock a variety of non-Nikon accessories, consumables and equipment. The only thing lacking is a second-hand selection. For service, stock and knowledge, I cannot recommend them highly enough.
Tuesday, 26 May 2009
The Photographer's Gallery
I have never been to the Photgraphers' Gallery on Ramilies St before, despite it being there for the last 38 years. It seems to be a mixture of gallery, education centre and bookshop, which seems like an excellent idea. I went somewhere similar when I was in Paris, the Maison Europeenne de la Photographie, which was a combination of several galleries, cafe, bookshop and auditorium. I'll make a trip sometime in the next few weeks to see what it's like and post back.
Monday, 25 May 2009
Review - Lowepro Mini Trekker AW
One of the many things I like to do with my girlfriend is to go for country walks. We're members of Walking World, so we're never stuck for somewhere to go whereever we are. I like to use it as an excuse for taking pictures, and have bought an excellent backpack for carrying all my kit in. I can't recommend the Lowepro Mini Trekker highly enough. I found the best price at Amazon (link below), followed by Warehouse Express. I got mine last year for £59.99, and it was one of the best investments I've made.
The Lowepro Mini Trekker AW is a multi-pocketed canvas backpack, designed purposely with the travelling photographer in mind.
The Mini Trekker has a roomy main compartment inside - enough for carrying an SLR camera with a lens attached, and several more besides. The main compartment is further divided into smaller compartments, made of interchangable velcro segments. They're surprisingly secure, so your kit won't rattle around. All in all, assuming you use all of the inner pieces, there are around 12 compartments, though you can have less if you want. You'll comfortably have room for about 5 - 6 lenses of varying sizes, which is more than enough for most people, along with flash units, filters and other gadgets. The inner compartments are very well padded, providing excellent protection against all sorts of knocks.
The Mini Trekker also has several external pockets for other pieces of kit. I use these for storing some of my less essential (certainly less breakable) equipment, since there's no real padding on the outside. There is enough room to fit in a few trekking supplies, but not enough to hold all your hiking equipment as well as your camera kit. There is an excellent tripod holder in the form of two bungee cords on the outside. This took me a bit of practice to learn to use properly, but now I've worked out the best way to secure my tripod to it, I find it indispensible on long hikes. However, this is also where the only design flaw in the Mini Trekker rears its head. While carrying a tripod, you cannot use the built-in waterproof cover for the pack. This hasn't been a problem for me so far, but if you were on a long hike and got caught in some heavy rain, you'd need to seek a workaround. There are also some links on the outside of the pack for some add-on pockets I believe you can buy from Lowepro if all the storage space isn't enough, but I haven't had any need for them.
The pack is comfortable to wear with generously wide shoulder straps, and two front-fastening straps to keep movement to a minimum. I have given mine some fairly rough handling and found that it more than stands up to the task. If you're going on a lengthy walk for several days and want to carry just one pack including all your camera kit, then you'll need a larger pack than this. However, if you're going just on a day trek or you've got someone else to carry your other kit, you'll struggle to do better than the Lowepro Mini Trekker. For your £60, you're getting quality materials that won't let your camera get damaged, and allow you to carry your kit comfortably from A to B. As the Ronseal man might say...it does exactly what it says on the tin.

Sunday, 24 May 2009
Steps in the Woods
 Steps in the Woods
Shot near Polesden Lacey in Surrey, I like challenging myself to taking photos from unusual angles. It's a really basic tip that I've learned to take on board, and I don't think anything has had such a dramatic effect on my photography. I'm a big fan of getting "in" to the subject, and in this photo, I particularly enjoy all the detail on the floor and the way that the steps lead the eye up to the bridge. I ended up covered in dust and dirt, but I got the shot I wanted. If you're shooting something at head height (as most subjects are usually shot), try having a go at shooting it from below - you don't need any extra equipment, just a willingness to get a little mucky! I'll upload some shots of some bluebells where I used this technique in a couple of days' time. Do make sure you have a look at the large shot to get the full impact, and let me know your thoughts.
Subscribe to:
Comments (Atom)
